 |
||||
|
views:
June 1, 2013 When we first started out on our Locost build, we had thousands of tasks to look forward to. During the past two years we always worked on several of those tasks at once, just to keep things interesting, and also because sometimes we had to wait for parts to arrive. Now that the list of tasks has shrunk to only a few hundred, we've noticed that we stopped doing that. Lately it seems like we've been focusing on one job at a time, like the dashboard for instance, or the body panels. When we first created our build plan, we had a couple of tasks on the list, like the lights, the interior, and the windshield, that were so far ahead in the future, and so totally dependent on almost everything else being done, that we never imagined we'd ever get around to working on them. We never thought about starting them, and never spent any time figuring how to do them. We thought we'd get to them when their time came, which might be never. Now it looks like their time has come. We still plan to do the bodywork next, but we need to get started on a few of those other tasks, because a lot of the bodywork will involve painting and therefore lots of spare time while we wait for paint to dry. So to keep busy we're going to need to work on the lights, the interior, and the windshield. And a few more things.
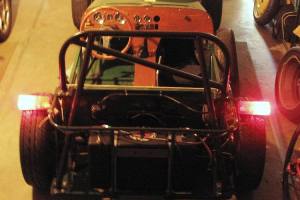
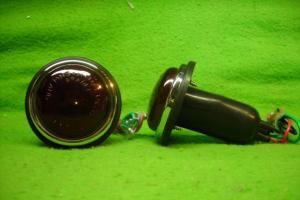
So we started by taking a look at the lights. All of the electrical work is done, and all of the wires for the lights have power when the proper switch is activated. So all we need now are the actual light assemblies. We ordered some generic Dietz type hot rod headlights from Speedway Motors, which will bolt directly to our headlight bar and plug directly into our wiring harness, so that'll be easy. We also have the taillights, and we've plugged them in and they work, so we just have to bolt them on, once we have a place to bolt them to, like the fenders. Also in the rear of the car are wires for the license plate lights and reverse lights. We have two options on the license plate lights, either classic MGB license plate lights from Moss Motors at $23 each, or classic O'Reiley Auto Parts generic license plate lights at $5 each. They look almost the same. The MGB lights fit the MGB license plate frame better, or actually perfectly, but the O'Reiley lights also fit and are just a little bit smaller. We'll probably go with the low bidder on this one. We can always replace them later on. For the reverse lights we have the same options, but in this case the classic MGB back-up lights from Moss Motors are only $15, and we haven't found any back-up lights at O'Reiley that look similar. Not that the back-up lights have to look exactly like MGB back-up lights, but we do need to make sure they don't look like back-up lights from a Buick or a Toyota Highlander. So it looks like we'll go with Moss Motors on this one. One thing we learned from this exercise that we'd like to pass along to future Locost builders: get everything you can off your donor before you send the stripped chassis off to the wrecker, even if you're absolutely sure you're never going to use those back-up or license plate lights. Rust and crud is less of a problem than you might think, and even though it seems at the time that you can easily replace an old part, it turns out new parts cost money, and you can afford some of them, or even a lot of them, but maybe not all of them.
Up front we have only the headlights and parking light/turn signals to worry about. As noted, the headlights will be easy, or not easy, but you know, possible. We're less sure about the parking light/turn signals, because we have more than two options, and our favorite option costs around $90 for the pair, plus shipping. Which is more than the headlights cost. But they're classic Lucas L488 dual-filament units with glass amber lenses that say LUCAS on them, and would look totally cool on our Locost. Other options include MGA turn signal/parking lights from Moss Motors, $70 for the pair, or classic Mini turn signal/parking lights with plastic lenses from a place called Spridget Mania, at $40 a pair. Cheap, but lenses on the Spridget lights are clear, so we'd therefore also have to buy amber lenses for them, because all Locosts have amber turn signal/parking lights, and that would raise the cost. Maybe not into the L488 range, but close enough.
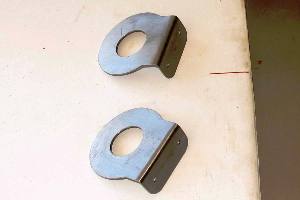
We plan to mount the turn signals using standard Locost technology, 16 gauge sheet metal brackets bolted to the headlight bar. We cut the brackets using the dimensions of the L488, and even though we don't have an actual L488 on hand to test fit, we're confident as always that we can make new brackets if we have to. But we think these will work, based on published reports that place the diameter of L488s at 2-3/4", and also on our best guess from photographs that the bulb base is about 1-1/4 inches in diameter. So that's where we're at right now, and in case you noticed, despite earlier references, the lack of any pictures of Locost bodywork in this week's report, we can assure you we're well aware of the problem, we're working on it now, and we expect to have it corrected before the next meeting. |
About Our Locost Please Note: Our database is currently unavailable so you will not be able to browse through log entries. This happens sometimes, and it usually doesn't last long. We're sorry for the incovenience. Please try again later. Or in a few minutes. | |||
 Home
Home


